
Content
- How to fill a planter properly - instructions in 3 steps
- Step 1: Drainage - effective challenge to waterlogging
- If necessary, re-drill the bottom holes
- Step 2: Spread Breathable Fleece
- Step 3: Optimize and fill the substrate
- Tips
Good drainage protects the plants from waterlogging
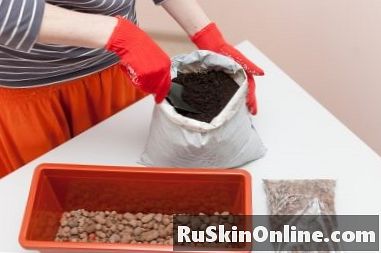
How to fill a planter properly - instructions in 3 steps
When recreational gardeners plant their window boxes, the importance of filling is often underestimated. However, the right substrate alone is not enough for perennials and flowers to develop a furious floral splendor. Read here how to optimally fill a flower box in 3 steps.
Step 1: Drainage - effective challenge to waterlogging
If rainwater and irrigation water in the flower box can not run unhindered, your valuable plants have little chance of survival. In waterlogging root rot is inevitable. To effectively prevent this problem if you fill a balcony box in the first step with a 3 to 5 cm high drainage of inorganic material. Well suited are potsherds, expanded clay, pebbles or grit.
If necessary, re-drill the bottom holes
In plastic flower boxes, the important bottom holes are usually pre-cut. With a screwdriver, please pry these openings before filling the drainage. Only then is it ensured that no waterlogging can form in the planted balcony box.
Step 2: Spread Breathable Fleece
So that the soil crumbs of the substrate do not clog the drainage, in the second step you place a thin fleece over it. For this purpose use a water- and air-permeable material and no foil.
Step 3: Optimize and fill the substrate
Please do not give your precious plants a cheap potting soil from the discounter. Such substrates usually contain a high proportion of peat, which is questionable from an ecological and horticultural point of view. In the store, therefore, access a high-quality, low-peat plant soil that you can optimize and fill with:
Set the remaining substrate aside. Now plant the stuffed perennials and flowers. In the end, fill the balcony box with soil up to 2 fingers under the edge, so that no water spills over when pouring.
Tips
If you are building a wooden balcony box yourself, please first lay it out with foil. Only then fill the vessel with the substrate recommended here. As a foil can serve a cut garbage bag. Of course, a thin pond liner is more durable. Above the bottom holes cut the film in a cross shape so that rainwater and irrigation water can drain off.